What is Docker?

Docker is one of the most popular implementations of “containerized software” which creates a cross-platform and highly scalable environment for developing and running software.

Wait, what? What is “containerized software”?

Lets start with a short example. Lets say your main development machine is a machine running on Ubuntu and you want to develop a basic webpage. Sure you can install a web server natively in your main OS but then your “setup” only works for your machine or machines with the same OS.

Containers are sort of a bare OS with (usually) just the software installed to run whatever you need for your app. So in our example we would install a NGINX webserver inside that container and build our webpage inside that container.

The main advantage here is the fact, that the whole docker eco-system is cross-platform compatible. This means, when you are done creating your app in your linux development machine you can basically copy that docker project to e.g. a MacOS or Windows machine, start docker the same as you did in your linux machine and everything (should) work.

So everything is handled via containers?

Well we are not done yet with explaining docker – there are still “images” to explain.

As described before “containers” are your implementation of your app with everything around already configured. But what if you want to build a very similar web page from before?

Instead of having to setup every container from the base up there are ready made “images” which offer you a pre-configured system where you only insert your app code and nothing else.

Images can therefore be seen as blueprints for your containers.

All available official images can be found here: https://hub.docker.com/search?q=&type=image

I want to create my first container!

First of all check, that you have installed the latest Docker software according to https://docs.docker.com/get-docker/

Then you can just open your CLI and enter the following command

docker run --name some-nginx -v /Users/kevin/dockertest:/usr/share/nginx/html:ro -d -p 8080:80 nginx
  • docker: Docker CLI binary which allows you to manage everything docker related in your shell
  • run: Create a new container
  • –name: Give your container a human friendly name
  • some-nginx: The human friendly name
  • -v: Bind a local volume (folder) into the container
  • /Users/kevin/dockertest:/usr/share/nginx/html:ro
    • /Users/kevin/dockertest: is the absolute path on your host system you want to mount
    • /usr/share/nginx/html: is the absolute path in the container you want to mount into
    • ro: read-only mode (see here)
  • -d: Run the container detached from the shell (see here)
  • -p: Mount a specified host port to the containers internal port
    • 8080: The port which will be used in the host system
    • 80: The port which will be used in the container system
  • nginx: The name of the image this container should be based on

Please adjust the /Users/kevin/dockertest part according to the absolute path on your local machine (just some random test folder)

If you are running on MacOS or Linux it should look something like this

-> % docker run --name some-nginx -v /Users/kevin/dockertest:/usr/share/nginx/html:ro -d -p 8080:80 nginx
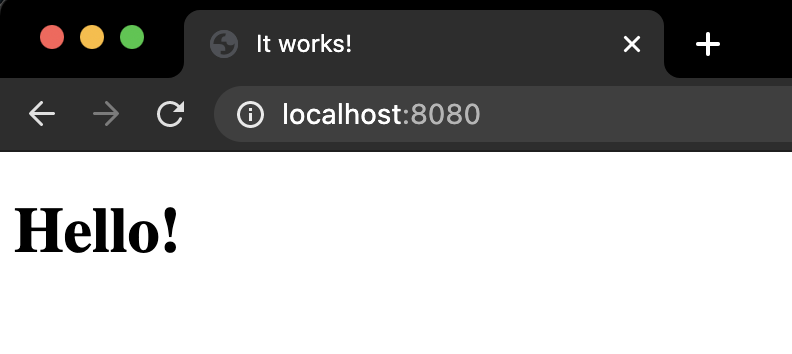
1d7b787fcbe8d6ee71b9e09908a2027c48d5c4b6cd146eb26314a0dacf763f2a

Basically nothing special, but now lets create a index.html in that directory

<!doctype html>

<html lang="en">
<head>
  <meta charset="utf-8">
  <title>It works!</title>
</head>

<body>
  <h1>Hello!</h1>
</body>
</html>

And now open up http://localhost:8080

You should now see the HTML from above in your browser.

You can now see your running docker container either in your Docker Dashboard (which was installed when you installed Docker) or you can enter the following command:

-> % docker ps
CONTAINER ID   IMAGE     COMMAND                  CREATED          STATUS          PORTS                  NAMES
d6ee6e327100   nginx     "/docker-entrypoint.…"   12 minutes ago   Up 12 minutes   0.0.0.0:8080->80/tcp   some-nginx

Here you can see that a container named some-nginx was created 12 minutes ago and has a port mapping from the hosts 8080 port to the containers 80 port.

Other usefull CLI commands

  • docker images: List all available images
  • docker rmi %image-name%: Remove a specific image
  • docker pull %image-name%: Update a specific image to the latest version
  • docker ps: List all running containers
  • docker ps -a: List all containers (also stopped)
  • docker rm %container-name%: Remove a specific container

Docker NFS Implementation for better performance in MacOS 11 (Big Sur)

First of all: Docker in general is a very popular topic and has many ways how it can be used, configured and worked with. The following statements are how I interpreted the whole docker ecosystem and how I personally got a working docker environment with MacOS.

It has been known for a long time, that Docker has performance issues under MacOS. You can also find many other tutorials online which seem to improve the performance but in my experience most of them didn’t.

The Problem

Basically Docker for MacOS doesn’t “mount” the filesystem of the container the same way as Linux does.

In Linux Docker basically “separates” all its containers via namespacing. This namespacing feature is present in the Linux kernel but MacOS is not based on Linux.

Therefore in Linux there is no difference between files on the host and container system but MacOS has to circumvent this feature “somehow”. And this “somehow” basically creates a whole lot of latency which reduces the performance dramatically.

I can definitely recommend this whole series from LiveOverflow where he goes deeper into the whole namespacing topic and why linux docker containers are not VMs (if you are interested)

The solution

I found the following blog article which basically has the solution + performance benchmarks in them:

https://www.jeffgeerling.com/blog/2020/revisiting-docker-macs-performance-nfs-volumes

So definitely kudos to him!

To summarise:

Edit/Add the file /etc/exports and add the following line:

/System/Volumes/Data -alldirs -mapall=501:20 localhost

This file is a config file used by the NFS system available under MacOS. So therefore this line exports the directory /System/Volumes/Data including all subdirectories to the localhost.

It could be that a permission popup shows while saving this file. Please accept that.


Edit/add the file /etc/nfs.conf and add the following line:

nfs.server.mount.require_resv_port = 0

This line is required to tell the NFS daemon to allow connections from any port. Otherwise Docker’s NFS connections may be blocked.


Now restart the NFS Daemon to reload the new config

sudo nfsd restart

Finally I had to add Full Disk Access to the NFS Daemon.

Go to System Preferences ==> Security & Privacy ==> Tab Privacy ==> Full Disk Access

Click the lock at the bottom left to allow editing the entries.

Then click on the + icon to add a new entry.

Now press CMD + Shift + G to enter the absolute path /sbin/nfsd and klick GO

The nfsd should now appear in the list of apps which should have Full Disk Access and the checkbox next to it should be checked.


The last step is to adjust your docker-compose.yml to actually use NFS instead of the normal volume binding.

Here is an example of an “old” docker-compose.yml

version: "3.8"
services:
  web:
    container_name: sl_web
    build:
      context: .
      dockerfile: docker/web/Dockerfile
    ports:
      # 'host:container'
      - '80:80'
    networks:
      - frontend
      - backend
    volumes:
      - ./webvol:/var/www/html:cached

  mysql:
    container_name: sl_db
    image: mysql:5.7
    command: mysqld
      --character-set-server=utf8mb4
      --collation-server=utf8mb4_unicode_ci
      --init-connect='SET NAMES UTF8;'
    ports:
      # 'host:container'
      - '3306:3306'
    networks:
      - backend
    environment:
      - MYSQL_ROOT_PASSWORD=sl_db_root_password
      - MYSQL_DATABASE=sl_db_name
      - MYSQL_USER=sl_db_user
      - MYSQL_PASSWORD=sl_db_password

  phpmyadmin:
    container_name: sl_pma
    image: phpmyadmin/phpmyadmin
    networks:
      - frontend
      - backend
    environment:
      PMA_HOST: mysql
      PMA_PORT: 3306
      PMA_USER: root
      PMA_PASSWORD: root
    ports:
      # 'host:container'
      - '8080:80'

networks:
  frontend:
  backend:

As you can see the web container uses a normal volume binding to mount the hosts webvol folder to the containers /var/www/html folder

And here are the main changes which need to be done for the NFS implementation

Adjust the volume mount from ./webvol:/var/www/html:cached to nfsmount:/var/www/html:cached

  web:
    ...
    volumes:
      - nfsmount:/var/www/html:cached

This tells docker to use the “named volume” nfsmount to mount into the containers path.

Now we have to define the “named volume” at the bottom of our docker-compose.yml

volumes:
  nfsmount:
      driver: local
      driver_opts:
          type: nfs
          o: addr=host.docker.internal,rw,nolock,hard,nointr,nfsvers=3
          device: ":$PWD/webvol"

As you can see the adjusted document root path is now being set in the device config of the volume definition.

And with that we should be fine.

Adding a nfo.php to the webvol folder, starting the docker instance and browsing localhost/nfo.php should result it.

You can download this whole project template HERE.

Docker-Engine Debug-Mode default on

After talking about docker performance issues with a friend of mine (thanks Simon from BoltCMS Slack) he told me, that Docker itself has a debug mode which drastically reduces performance.

And as you can see here this setting is set to true.

After setting that to false and recreating my containers my performance had drastically increased.

I have no idea why this is a default setting Docker sets (for at leat the MacOS Client) but this in combination with the NFS mount was the solution to my performance problems I had Docker on MacOS.